
A paring knife blade typically measures between 3 and 4 inches long with handles spanning 3.5 to 4.5 inches [1]. Here's why that size matters: blades shorter than 3 inches can't slice through medium-sized fruits in one clean motion, while anything longer than 4 inches feels clumsy for detailed hand work [3]. Most chefs find the sweet spot at 3.25 to 3.5 inches--just right for maintaining control wh...
What Is a Paring Knife? Definition and Key Characteristics
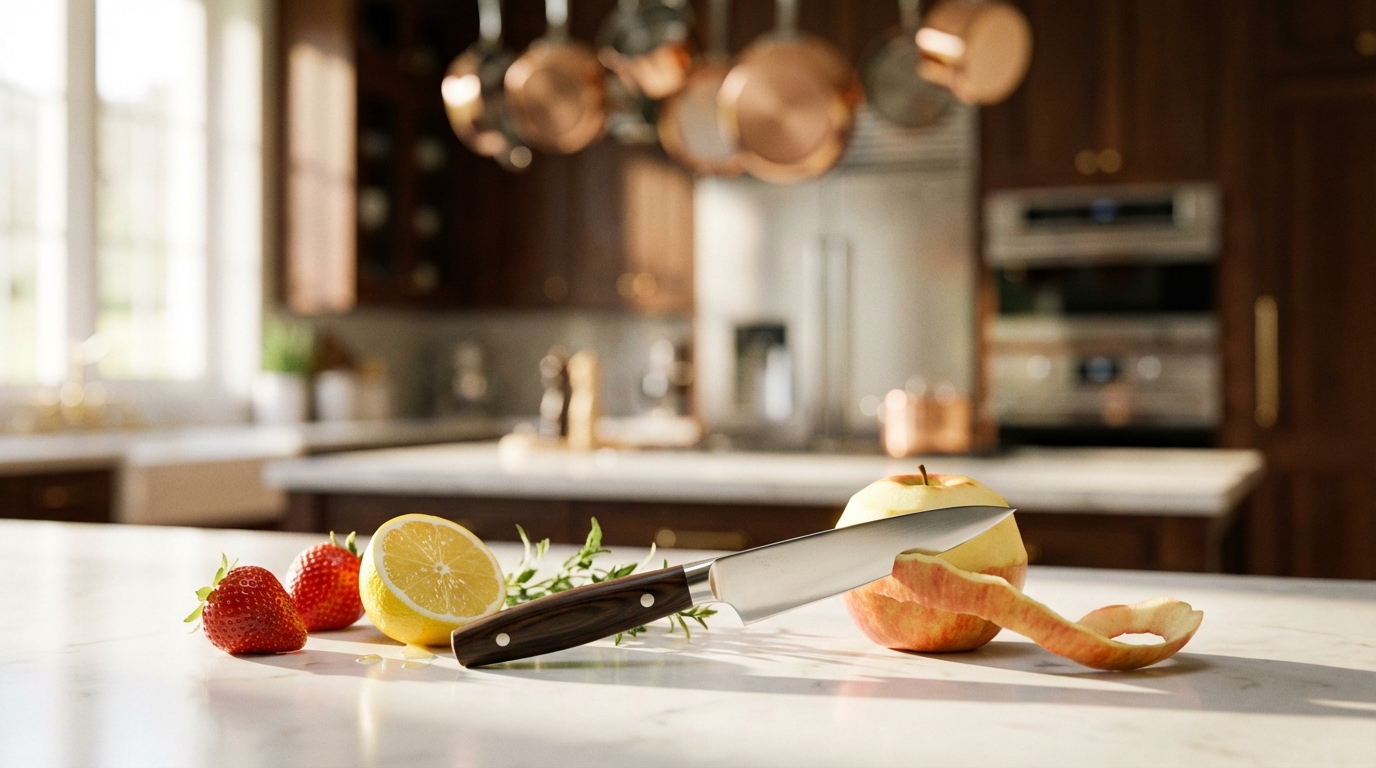
A 3.25-3.5-inch high-carbon stainless paring knife--shaped like a miniature chef's knife with a razor-sharp point--gives you the control to core, peel, and garnish produce in one clean motion without the clumsiness of longer blades.
Size and Blade Shape
A paring knife blade typically measures between 3 and 4 inches long with handles spanning 3.5 to 4.5 inches [1]. Here's why that size matters: blades shorter than 3 inches can't slice through medium-sized fruits in one clean motion, while anything longer than 4 inches feels clumsy for detailed hand work [3]. Most chefs find the sweet spot at 3.25 to 3.5 inches--just right for maintaining control while still having enough reach for everyday tasks [2].The blade shape varies across different paring knife styles, each designed for specific tasks.
Standard paring knives look like miniature chef's knives with straight, pointed edges [3]. This sharp, precise tip is what makes them perfect for coring tomatoes, hulling strawberries, or getting under shrimp shells [1]. Some paring knives have a slightly curved belly that helps when mincing shallots or herbs, though you'll sacrifice some precision for intricate work [1].
You'll also find specialty shapes: bird's beak blades with curved tips for peeling round produce, and serrated edges for tough-skinned fruits like tomatoes [2]. That pointed tip is key--it gives you the control to core fruits, create garnishes, and handle delicate tasks without damaging the good parts [3].
Typical Materials and Construction
When it comes to materials, paring knives keep things straightforward and functional. High-carbon stainless steel blends work particularly well in these small knives--they hold their edge beautifully while resisting the rust and stains that come with kitchen use [4]. The steel typically falls between 58-62 on the Rockwell hardness scale, which means it stays sharp but won't chip if you look at it wrong [5].
Most paring knives use monosteel construction (one piece of steel throughout), which makes them stronger and easier to sharpen at home [6]. This simple design is standard for both Western-style paring knives and budget-friendly Japanese options [6]. Sure, you'll find fancy Damascus or layered steel paring knives out there, but for most home cooks, these elaborate constructions don't add much beyond looks [6].
The blade finish--whether mirror-polished or satin--mainly affects how easily food releases and how often you'll need to wipe the blade clean [6]. Unlike larger kitchen knives where complex construction might make sense, a good paring knife focuses on what matters: nimble handling and precise control [5].
Why the Small Size Matters
The paring knife's small size is exactly what makes it so useful. That short blade gives you the control needed for detailed work that would be impossible with a chef's knife [7].
This compact design is what lets you tackle all those fiddly kitchen tasks--from peeling and trimming to coring and creating garnishes--with real precision [7]. Think of it as your kitchen's detail brush, perfect for the intricate prep work that makes dishes look and taste their best [7].
When you combine this compact size with quality materials and a comfortable handle, you get the perfect tool for precision work. That's why a well-chosen paring knife, like this 3.5-inch version, becomes one of those kitchen tools you reach for constantly.
Everyday Kitchen Tasks: What is a Paring Knife Used For?
Master the pinch-grip and claw-shield technique with a paring knife to peel delicate plums and hull strawberries without wasting a single millimeter of precious fruit.
Peeling and Trimming Fruits and Vegetables
Your paring knife becomes a precision peeling tool when you need to preserve every bit of delicate fruit. It's perfect for thin-skinned produce like plums, peaches, and nectarines--saving more flesh than a standard peeler would [8]. Here's the technique: hold your knife with a pinch grip (thumb and index finger just above the handle) while your other hand forms a protective claw shape [9].
For round fruits, trim the ends first to create stable surfaces, then peel downward in smooth, controlled strokes [9]. Quick tip for stubborn skins: blanch tomatoes or peaches briefly in boiling water, then plunge them into an ice bath--the skins will slip right off [9]. Save your vegetable peeler for tougher-skinned items like pears, mangoes, and kiwi where you want quick, long strips and precision isn't critical [8].
The real advantage of using a paring knife? You can navigate around blemishes and odd shapes with complete control--something a rigid peeler simply can't do.
Hulling Strawberries and Small Berries
Hulling strawberries is one of those simple skills that makes a real difference in your cooking. Instead of just slicing off the top (which wastes perfectly good fruit), hulling removes only the green leaves and white core while keeping that beautiful berry shape intact [10]. Here's how to master it: hold the strawberry in one hand and angle your paring knife tip at 45 degrees toward the top. Insert the blade right where the white core meets the red flesh, then simply rotate the berry while keeping your knife steady--the stem and leaves will pop out in one neat cone [11].
Keep your thumb close to the blade for better control, applying gentle pressure as you turn [10]. Need to hull a whole flat of berries? Try the straw method: push a sturdy straw (metal works best) through the bottom tip straight up through the top. The stem pops right out, leaving a clean hole through the center [12].
This technique is perfect for jam-making or smoothies, though you'll want to stick with the knife method when presentation counts [11]. The same techniques work great for any small berries that need their caps removed--just adjust your approach based on the fruit's shape.
Deveining Shrimp and Cleaning Small Seafood
Deveining shrimp becomes quick and easy once you know the trick--and your paring knife is all you need. That dark line along the shrimp's back is the intestinal tract, and while it's safe to eat when fully cooked, many people prefer to remove it to avoid any grittiness [13]. For shell-on shrimp, make a shallow cut (just ⅛ to ¼-inch deep) along the curved back. Then use your knife tip to lift out the vein--it usually comes out in one piece [14].
Working with peeled shrimp? Even easier. Lay each shrimp on its side and make a light cut from tail to head, then remove the dark vein [14]. Here's a pro tip for keeping shells intact: slip your paring knife tip between the second and third shell segments, gently lift the vein above the shell, then pull it out.
This method keeps your presentation perfect [14]. Skip the single-use gadgets--professional chefs like Eric Ripert and Andrea Nguyen rely on their trusty paring knives for this task [13]. For tiny shrimp, you can often skip deveining since the vein is barely noticeable. But definitely remove it from larger shrimp or anything you're serving raw--nobody wants a sandy or bitter surprise [14].
Slicing and Dicing Tiny Ingredients
When you're working with tiny ingredients like garlic, shallots, ginger, or fresh herbs, your paring knife gives you the control a larger blade simply can't match [15]. These small items would practically disappear under a chef's knife, but a paring knife keeps everything visible and manageable. For mincing garlic, try this technique: grip your paring knife handle firmly and use a gentle rocking motion. Keep the tip touching the cutting board while you lift and lower the heel for quick, precise chops [15].
Want even more control? Use a pinch grip close to the blade--this gives you the stability to make those perfect tiny cuts [16]. The real magic happens when you're creating small dice (those perfect ⅛-inch cubes) or brunoise for garnishes. Your paring knife's pointed tip lets you score guidelines first, ensuring every cut is uniform [16].
This consistency isn't just about looks--it ensures everything cooks evenly too. Plus, the gentle cutting action preserves those delicate cell structures in herbs and aromatics, keeping all those wonderful flavors intact instead of crushing them out onto your cutting board [17].
Precision Techniques and Creative Uses
With a paring knife's razor-sharp tip and nimble blade, you can sculpt tomato-rose garnishes, score artisan bread that blooms into perfect patterns, and carve citrus twists--turning every dish or drink into a miniature edible artwork.
Creating Garnishes and Decorative Cuts
The paring knife transforms into an artist's tool when creating garnishes, allowing for precision that larger knives can't match. With its nimble blade, you can craft roses from tomato peels, shape fruits into flowers, and create intricate garnishes for cocktails and mocktails. The knife's sharp tip excels at decorative scoring--creating patterns on bread dough that control expansion during baking while adding visual appeal, or making vents in pie crusts that allow steam to escape.
Professional chefs leverage the small blade to execute complex garnishing techniques that elevate presentation, turning everyday ingredients into display-worthy accents. The control offered by a paring knife lets you work in three dimensions, carving radishes into flowers or creating citrus twists with clean, precise cuts impossible with larger blades. Unlike specialized garnishing tools, the paring knife offers versatility to tackle multiple decorative techniques with a single implement, making it the preferred choice for both home cooks and professionals seeking to add visual flair to their dishes.
In skilled hands, this small knife becomes the culinary equivalent of a fine-point brush--creating detailed work that transforms ordinary plates into artistic presentations.
Scoring and Scalding Delicate Foods
The paring knife's precision and sharp tip make it the ideal tool for scoring--creating shallow, decorative cuts that serve both functional and aesthetic purposes. For bread dough, scoring creates controlled expansion points that allow steam to escape during baking while creating distinctive patterns that identify different loaf types.
The technique involves making deliberate slashes after the final proofing, typically in combination patterns that control how the bread expands. Beyond bread, paring knives excel at scoring pie crusts to vent steam and prevent bursting, and creating shallow cuts in meat that help marinades penetrate deeper while creating crispier edges when cooked.
The knife's maneuverability allows for the creation of detailed patterns impossible with larger blades--you can score intricate leaf designs or geometric patterns that transform ordinary baked goods into artistic creations. For preparing delicate fruits like tomatoes or peaches for scalding (briefly immersing in boiling water to loosen skins), the paring knife creates the initial score marks that allow easy peeling after the quick hot water treatment.
Coring and Segmenting Citrus
The paring knife excels at segmenting citrus--a technique that removes the juicy flesh while leaving behind bitter pith and tough membranes. Start by washing the fruit and cutting off both ends to create stable flat surfaces. Stand the fruit on one end and, following the natural curve, cut downward with short strokes to remove strips of peel and white pith. Inspect and trim any remaining membrane for cleaner segments.
To extract the segments, either hold the prepared fruit over a bowl or place it on a cutting board. Insert your knife blade directly alongside one membrane, cutting toward the center. When you reach the core, rotate the blade to separate the segment from the opposite membrane. This precision technique transforms oranges, grapefruits, and other citrus into membrane-free sections perfect for salads, desserts, and garnishes.
The paring knife's pointed tip and narrow blade provide the control needed to follow the fruit's natural divisions without wasting flesh--something larger knives make difficult. A quality
Working Without a Cutting Board
The paring knife stands apart from other kitchen knives because it's specifically designed for in-hand cutting--a technique where food is held in one hand while cutting with the other, eliminating the need for a cutting board. Unlike larger knives that require the stability of a cutting surface, the paring knife's compact size and precise control make it perfect for this freehand approach. When peeling fruits or vegetables, hold the item in your non-dominant hand and rotate it while using the knife to remove just the skin, directing the blade toward your thumb which acts as a guide and stopping point.
This technique reverses the standard cutting rule--with a paring knife, you'll often peel toward your body rather than away from it, giving you better control over delicate tasks. Safety remains paramount--always keep your fingers tucked away from the blade's path, maintain a firm grip on both knife and food, and use controlled, deliberate movements rather than forceful cuts. The in-hand technique excels for small, detailed tasks including peeling garlic cloves, removing citrus segments, and creating garnishes--situations where the cutting board might actually hinder precision rather than help it.
(For hulling strawberries, see the detailed technique in "Everyday Kitchen Tasks" above.) Master this skill, and you'll dramatically increase your efficiency for quick prep tasks, freeing up counter space and reducing cleanup while maintaining professional-level precision.
Selecting a Quality Paring Knife for Daily Use
Choose a paring knife with an ergonomic, textured handle that balances blade-to-handle weight and can be either a $15-20 replaceable workhorse or a $50-plus lifetime investment you keep sharp for decades.
Blade Steel: High‑Carbon Stainless vs. Carbon
Error processing section content.
Handle Comfort and Grip
The handle design of a paring knife directly impacts control during precision tasks. Ergonomically shaped handles prevent hand fatigue during extended use while providing stability for detailed cutting work [22]. For maximum grip security, look for textured surfaces or soft rubber inserts that maintain stability even when working with wet ingredients [22].
Hand size determines ideal handle dimensions--larger hands benefit from longer handles while smaller hands gain control with compact designs [22]. The best handles encourage a pinch grip position, allowing you to "choke up" on the knife, bringing your hand closer to the cutting edge for better control when peeling small, knobby foods [23]. Handle-to-blade weight ratio significantly affects performance--excess weight in the handle makes the knife feel unstable during delicate tasks [23].
When testing quality paring knives, experts evaluate whether a knife feels balanced enough to "sit there all day and peel, without feeling it" [23].
Optimal Blade Length (3‑4 inches)
Error processing section content.
Budget vs. Longevity: Investing in Durability
Paring knives present a unique value proposition compared to larger kitchen knives. You can choose between two distinct approaches: invest in a higher-quality knife that lasts for years or purchase inexpensive options that you replace periodically. Budget paring knives (around $15-20) offer impressive performance right out of the box but will eventually dull beyond recovery, requiring replacement after a couple years of use [23].
While they won't provide the lifetime of service that higher-end models offer, you could buy six budget knives over 30 years for the price of one premium option [23]. The key durability factor is whether a knife can be effectively sharpened over time. Premium models ($50+) can be maintained with whetstones or knife sharpeners, making them kitchen investments that remain serviceable for years [23].
Construction quality significantly impacts longevity--full tang blades with riveted handles resist breaking, while budget plastic handles might eventually separate from the blade [23]. High-carbon stainless steel blades maintain their edge longer than basic stainless, though require more careful maintenance to prevent rust [1]. When deciding between budget and premium options, consider your usage patterns: professional chefs and serious home cooks who use paring knives daily benefit from investing in durability, while occasional users might find budget options more practical [1].
Simple Care and Maintenance Routine
Wash, dry, and hone your paring knife in under a minute to keep it razor-sharp for years--hand-wash only, skip the dishwasher, and realign the edge with a few light strokes on a ceramic rod.
Hand‑Wash and Dry Properly
Here's the secret to keeping your paring knife sharp: wash it right after you use it. Simply run cold water over the blade while gently rubbing with your fingers or a sponge--just keep that sharp edge pointed away from your hand [24]. Quick cleaning prevents acidic foods from staining and food residue from dulling your blade [25]. Got greasy residue? A drop of dish soap on a soft sponge does the trick.
Skip the abrasive scrubbers--they'll scratch your blade [26]. Once clean, dry immediately with a clean cotton or linen towel. Pay extra attention to where the blade meets the handle, since moisture loves to hide there [25]. Never let your knives air-dry. You'll end up with water spots and potential rust, even on stainless steel [24].
And here's the thing about dishwashers: even if the manufacturer says it's okay, hand-washing is always better. Dishwashers blast your knives with damaging heat, harsh detergents, and risk banging them against other utensils [24][25]. If you have wooden handles, keep water exposure minimal and occasionally treat them with food-safe oil to prevent cracking [24]. The whole routine takes about a minute--a small investment that keeps your knife performing like new for years [25].
Regular Honing and Sharpening
Keep your paring knife sharp between major sharpenings with regular honing. This simple technique realigns the blade's microscopic edge without removing any steel. For straight paring knives, hold a ceramic or steel honing rod at a 10-15 degrees angle and draw the blade across with light, smooth strokes [27]. Got a curved bird's beak paring knife? Follow the blade's natural curve instead of using straight strokes [27].
When honing stops bringing back that sharp edge, it's sharpening time. Whetstones give you the best control--start with a medium grit (#1000) if you're new to this [28]. Here's the technique: first create a secondary edge by sharpening at 45 degrees until you feel a burr form, then drop to 10-15 degrees for the main sharpening [28]. Western-style paring knives work best with asymmetric sharpening--use a 70/30 ratio with the right side at a sharper angle and the left nearly flat [28]. Guided sharpening systems help beginners maintain consistency, with most paring knives needing a 19-21 degrees angle [29].
Electric sharpeners are convenient but remove more steel and offer less precision [29]. For those who prefer professional results without the learning curve, consider a mail-in sharpening service that can restore your knife to factory sharpness. Want to test if your knife is sharp enough? Try slicing through newspaper--a properly sharp blade glides through without catching [28].
Safe Storage Solutions
Smart storage protects both your paring knife and your fingers. Magnetic knife strips are the gold standard--your blade stays sharp, visible, and ready to grab [30]. Unlike bulky knife blocks that only fit certain sizes, magnetic strips handle any knife length and mount wherever works best in your kitchen [30]. Prefer drawer storage? Use a dedicated knife organizer with cork or wood dividers to keep blades separated [31].
Whatever you do, never toss knives loose in a drawer. You'll damage the edges and risk a nasty surprise when reaching for utensils [31]. No organizer? Plastic edge guards or wooden sayas (sheaths) protect the blade and your hands [30]. They're perfect for compact storage and prevent accidental cuts [25].
If your paring knife has a wooden handle, keep it somewhere dry--moisture can damage the wood and loosen the handle over time [31]. For travel or temporary storage, knife rolls keep everything organized and protected [30]. Your knives stay separated and secure, whether you're heading to a friend's house or storing them during a kitchen renovation.
Preventing Rust and Wear
Here's something many home cooks don't realize: even "stainless" steel can rust, especially in humid kitchens or near the coast. After cutting acidic fruits or salty foods, rinse your knife right away with fresh water and dry it completely [32]. Once a month, apply a thin coat of food-grade mineral oil to the blade. This creates an invisible shield against moisture and oxygen--the main culprits behind rust [32].
Already seeing rust spots? No problem. Grab some fine steel wool (Grade "0" or "00") and gently buff along the metal's grain, not across it. This removes rust without scratching [32].
Carbon steel paring knives need extra attention--oil them after every use and never put them away wet. If your knife has a removable handle, you can occasionally take it apart for deep cleaning, but most home cooks won't need to go that far [32]. The best rust prevention is simple: wash immediately, dry thoroughly, store properly, and oil regularly. Build these habits and your paring knife will stay sharp and rust-free for years to come.
Building a Practical Kitchen Toolkit Around the Paring Knife
Build a minimalist, high-impact kitchen by starting with just three knives--chef's, bread, and paring--then add only what your cooking style truly demands, knowing that even a $20 paring knife can deliver pro-level precision.
Integrating with Other Essential Knives
A functional kitchen requires just three essential knives: a chef's knife, a bread knife, and a paring knife [33]. This trio handles virtually every cutting task without unnecessary duplication or specialty tools that consume space but see limited use. The paring knife fills the precision gap left by larger knives, handling detailed work your chef's knife can't manage.
As your cooking skills develop, consider adding a utility knife (about 5-6 inches) to bridge the size gap between your chef's and paring knives, particularly useful for medium-sized produce and sandwich preparation [34]. A santoku knife offers an alternative to your chef's knife with its flatter edge and thinner profile, while a nakiri provides specialized vegetable-cutting capabilities [34]. When purchasing knives, two approaches work: invest in a high-quality core set first (chef's, paring, bread) and add individual pieces as needed, or buy an inclusive knife set if you're confident about your cutting needs [34].
Quality matters more than quantity--professional chefs often reach for the same three knives repeatedly, regardless of how many they own [33]. For budget considerations, the paring knife presents an interesting value proposition: unlike chef's knives where investment significantly affects performance, even affordable paring knives (around $20) perform admirably for their limited, precise tasks [34].
Cost‑Effective Replacement Cycle
Paring knives present a unique cost-benefit calculation compared to larger kitchen investments. For these small precision tools, you can follow either a high-replacement or low-replacement strategy depending on your cooking habits and budget. With budget paring knives ($15-25), expect to replace them every few years as they lose their edge beyond practical sharpening capabilities [35].
Professional chefs might replace heavily-used paring knives annually, while home cooks can extend the cycle to 3-5 years with proper maintenance. Watch for specific indicators that signal replacement time: visible chips or nicks on the blade edge, persistent rust spots that don't respond to cleaning, loose or damaged handles that affect grip security, and blades that remain dull despite proper sharpening attempts [36]. High-quality paring knives ($50+) can function effectively for decades with proper care, making them ultimately more economical despite higher upfront costs.
For commercial kitchens or cooking schools, many professionals adopt a hybrid approach--stocking multiple inexpensive paring knives for high-volume tasks while maintaining a few premium models for precision work. This balanced strategy maximizes value while ensuring appropriate tools are always available for specific techniques.
Sustainable Practices: Keep Tools for Life
The most sustainable kitchen tool is one you never replace. Quality paring knives can serve for decades with proper care, dramatically reducing waste and environmental impact. Choose naturally derived mineral oil over petroleum-based products for wooden handles--it prevents cracking while avoiding harmful chemicals [37]. This simple maintenance extends handle life and preserves knife balance.
Instead of discarding slightly dulled knives, prioritize sharpening to restore performance without generating waste. Professional knife sharpening services can revitalize even significantly worn blades, removing minimal material while creating a fresh edge [26]. For cleaning, skip harsh chemical cleaners in favor of gentle dish soap, vinegar solutions, or baking soda paste for stubborn stains and rust spots--these options effectively clean without introducing toxins into your kitchen or waterways [26]. When a knife truly reaches the end of its kitchen life, consider creative repurposing: old paring knives can become garden markers, craft tools, or be donated to metal recycling programs rather than entering landfills [37].
The sustainability equation starts with your initial purchase--investing in one quality knife that lasts decades creates less environmental impact than repeatedly buying and discarding cheaper options that fail after a few years [38]. This approach aligns economic sense with environmental responsibility.
Quick Reference Cheat Sheet for Common Uses
Now that you've learned the detailed techniques throughout this guide, here's your quick reference for mastering your paring knife. Keep this handy as you build confidence with each skill--remember, even professional chefs refer back to the basics. Peeling and skinning: Hold fruit in your non-dominant hand, angle the blade under the skin, and rotate the produce while slicing away peel in one continuous motion. Works best for kiwis, mangoes, and thin-skinned fruits where peelers would waste flesh [39]. Hulling berries: Insert the tip at a 45 degrees angle beside the stem, then rotate the berry around the stationary knife to carve out the stem and leaves in a circular motion. This technique keeps strawberries looking beautiful while minimizing waste [39]. Deveining shrimp: Make a shallow incision (⅛-inch deep) along the shrimp's back, then lift the dark intestinal tract with the knife tip.
For shell-on deveining, insert the point between the second and third shell segments to minimize damage [39]. Segmenting citrus: After peeling, hold the fruit in your non-dominant hand and cut precisely between each membrane to release perfect wedges. A quality paring knife makes this delicate work much easier [40]. Precision dicing: For tiny ingredients like garlic, shallots and herbs, use a pinch grip near the blade for maximum control. The small blade prevents crushing delicate cell structures while maintaining uniform cuts [40]. Coring: Remove the center portion of fruits by working the pointed tip around the core in circular motions. Perfect for tomatoes, apples, and similar produce where preserving the surrounding flesh matters [39]. Scoring: Create shallow decorative cuts on bread dough, pie crusts, or meats to aid cooking and enhance presentation.
Your paring knife's precision allows for intricate patterns impossible with larger blades [39][40]. In-hand cutting: Hold food in your non-dominant hand while cutting with the other, eliminating the need for a cutting board. Especially useful for quick prep tasks like hulling strawberries or peeling garlic [40]. Garnishing: Create roses from tomato peels, citrus twists, or vegetable flowers using the knife's maneuverability for three-dimensional decorative work that elevates your presentation [40]. Trimming imperfections: Remove blemishes or damaged areas on produce with clean precision. The small blade allows targeted removal without wasting the good portions [40]. Mincing: For small quantities of herbs, garlic, or shallots, use a rocking motion with the knife tip anchored to the board. The compact blade provides control that larger knives simply can't match for small ingredients [41].
- A 3.25-3.5-inch high-carbon stainless paring knife gives the best control for detail work.
- Hold produce in-hand and peel toward your thumb for maximum precision and minimal waste.
- Hulling strawberries with a 45 degrees knife twist removes only the core, preserving berry shape.
- Use a paring knife to devein shrimp with a shallow ⅛-inch back cut, keeping shells intact.
- Hone at 10-15 degrees to maintain the edge; switch to whetstones when honing no longer restores sharpness.
- Wash, dry immediately, and skip the dishwasher to prevent rust and edge damage.
- Three knives--chef's, bread, paring--cover virtually all kitchen tasks without redundancy.
- https://www.seriouseats.com/the-best-paring-knives
- https://therestaurantwarehouse.com/blogs/restaurant-equipment/paring-knife-guide?srsltid=AfmBOoqNtstsFLYW7YQPOOze0jktR41a2ZxQ4UQ7H-3MDVH0leDY_Dmv
- https://www.nytimes.com/wirecutter/reviews/best-paring-knife/
- https://www.kitchenknifeguru.com/shun-paring-knife/
- https://knifesteelnerds.com/2021/10/19/knife-steels-rated-by-a-metallurgist-toughness-edge-retention-and-corrosion-resistance/
- https://cutleryandmore.com/blogs/knives/kitchen-knives?srsltid=AfmBOoo0EfVo8tIA2LrUiPMOera1CI74bDxqPwB_tSCuEki1meYP_455
- https://nogentknives.com/what-is-a-paring-knife-used-for/
- https://www.tastingtable.com/1344786/when-to-peel-fruits-with-paring-knives-vs-vegetable-peelers/
- https://www.souschef.co.uk/blogs/the-bureau-of-taste/the-art-of-peeling-with-a-knife-a-practical-guide-for-everyone
- https://www.kitchngiggles.com/knife-skills-hulling-strawberries/
- https://food52.com/story/10541-how-to-hull-strawberries-2-ways
- https://www.thepioneerwoman.com/food-cooking/cooking-tips-tutorials/a65935135/how-to-hull-strawberries/
- https://www.epicurious.com/expert-advice/how-to-devein-shrimp
- https://www.hungryhuy.com/how-to-devein-shrimp/
- https://www.escoffier.edu/blog/recipes/paring-knife-101/
- https://kyokuknives.com/blogs/kyoku-chef-blog/5-essential-knife-techniques-for-holiday-meal-prep?srsltid=AfmBOoqdaySQCcTjqJPiCbMdJLz1BRCpYsbkVHhBtukD57iW0P6nZdU1
- https://www.yousunlong.com/14877/?srsltid=AfmBOookCbj5K1LPpS9eS_SlwUO1TvDotyJejQS-0iLNlte5AnTa1SlS
- https://yokashi.com/blogs/news/understanding-the-uses-of-a-paring-knife
- https://nogentknives.com/mastering-the-paring-knife/
- https://food52.com/story/12126-how-to-segment-citrus-like-a-pro
- https://kyokuknives.com/blogs/kyoku-chef-blog/15-essential-paring-knife-uses-every-home-chef-should-know?srsltid=AfmBOor9l4hTR3c8q5MPBP8sDMWXLZjdFYy7gD1wwx-Kudv5j6JFVx3T
- https://www.thespruceeats.com/best-paring-knives-4691096
- https://www.epicurious.com/expert-advice/best-paring-knife-article
- https://www.victorinox.com/en-US/Knife-Care-Tips/cms/knifecaretips/
- https://www.nytimes.com/wirecutter/guides/how-to-care-for-kitchen-knives/
- https://wickedhandy.net/kitchen-knife-care-and-maintenance/
- https://www.kitchenknifeguru.com/honesandsteels/how-to-hone-a-knife/
- https://global.ichimonji.co.jp/blogs/maintenance/petty-paring-sharpening?srsltid=AfmBOoqy5aQNblwcE1c7GFmiZAq7SLykP1AfwmTOPVpYZAufMPbeLTX0
- https://support.seatosummit.com/hc/en-us/articles/39541943096084-How-do-I-sharpen-a-Detour-Kitchen-Paring-Knife
- https://www.seriouseats.com/how-to-store-knives
- https://makanknives.com/how-to-store-your-knives-to-keep-them-sharp-and-safe/
- https://gearaid.eu/blogs/help/knife-care-101
- https://www.bonappetit.com/story/best-knife-sets?srsltid=AfmBOoqGs__-YxBa3FPP1TbRoFbErZQOHMLC6VTuS7Fc-j5FTu5OT-0c
- https://nymag.com/strategist/article/best-kitchen-knife-sets.html
- https://nogentknives.com/knife-care-and-maintenance/
- https://www.insight-kitchenknife.com/when-to-buy-new-kitchen-knives.html
- https://nogentknives.com/eco-friendly-knife-care-sustainable-practices-for-longevity/
- https://eliteprocutlery.com/extending-the-life-of-your-knives-best-practices/?srsltid=AfmBOooY0JFrHCQUtVJg4bquUPAPCD2jOcLemqcsvAWlJKzv3KUGoSBr
- https://www.cozymeal.com/magazine/what-is-a-paring-knife-used-for
- https://www.dalstrong.co.uk/blogs/chef-blog/14-paring-knife-uses-you-may-not-know
- https://www.escoffier.edu/blog/culinary-arts/different-knives-and-the-best-uses-for-each/