
Braising turns bargain-bin, collagen-heavy cuts--think chuck, short ribs, pork shoulder--into spoon-tender, restaurant-worthy meals by first searing for deep caramelized flavor, then slow-simmering at 180-195 degreesF in a covered pot until connective tissue melts into silky gelatin. The article walks you through every critical step: choose an enameled Dutch oven wide enough for even browning, dry-brine and tie bone-in pieces, build a half-submerged bath of stock, wine or tomatoes boosted with umami bombs like miso and dried mushrooms, and finish by puréeing the vegetables right into the sauce for zero-waste richness. You'll learn why temperature, not time, is the real secret (keep the liquid barely bubbling), how to troubleshoot tough or watery results, and how to transform leftovers into tacos, sandwiches or pasta fillings that taste even better after an overnight rest. Master these low-and-slow fundamentals and you'll unlock 30-50 % savings on groceries while delivering the kind of fork-tender, deeply flavored dishes that make everyday cooking feel like a special occasion.
Understanding Braising: Why It Works and When to Use It
Braising turns budget-friendly, hardworking cuts like chuck, brisket, and pork shoulder into luxuriously tender meals by holding them at 180-190 degreesF just long enough for stubborn collagen to melt into silky gelatin without squeezing out the juices.
What is braising and the science behind tender meat
Braising is a simple technique that transforms tough cuts into tender, flavorful meals by slowly cooking them in liquid in a covered pot. This centuries-old method works because of two key things happening in your pot. First, browning the meat creates deep, rich flavors as proteins and sugars caramelize on the surface [1]. Then comes the real magic--tough collagen (the connective tissue that's literally tougher than steel pound-for-pound [3]) slowly melts into silky gelatin when exposed to gentle heat and moisture [2].
Getting the timing and temperature right makes all the difference. In a pressure cooker at 250 degreesF, collagen breaks down in about 30 minutes but the meat tends to dry out. At conventional braising temperatures (185-195 degreesF), you'll need 2-3 hours for perfectly tender results. Using a slow cooker at 170-175 degreesF takes 6-8 hours but gives you the juiciest meat [2].
The sweet spot sits around 180-190 degreesF--hot enough to break down collagen without forcing the meat fibers to contract and squeeze out their juices [1]. Cook any hotter and you'll end up with tough, dry meat no matter how long you wait [1]. This gentle approach is what makes braising perfect for transforming affordable, hardworking cuts into something special [2].
Ideal cuts and budget‑friendly options for everyday cooking
The best cuts for braising come from the hardest-working parts of the animal--shoulders, legs, and chest areas--where dense muscle fibers and abundant connective tissue create incredible flavor when cooked low and slow [5]. These budget-friendly cuts typically cost 30-50% less than premium steaks but deliver richer, more satisfying results when braised properly. Beef chuck roast is your versatile workhorse, perfect for pot roasts and stews that taste like they took all day (even when they didn't) [4][5]. Short ribs bring serious depth to your cooking, especially when paired with mushrooms or tomatoes [6].
Brisket--go for the leaner first cut--offers bold flavor without breaking the bank [4]. Beyond beef, pork shoulder (sometimes labeled pork butt) is incredibly forgiving and transforms into everything from pulled pork to carnitas [6]. Lamb shanks cost a bit more but reward you with luxurious texture and concentrated flavor [6]. For everyday meals, consider these practical options: sirloin tip roast cuts into perfect stew chunks, while top round (London broil) becomes tender when braised and sliced thin against the grain [4].
Eye of round and bottom round work beautifully for weeknight pot roasts despite being quite lean [4]. Remember, what makes these cuts challenging for grilling or pan-searing--all that connective tissue--is exactly what makes them perfect for braising [5].
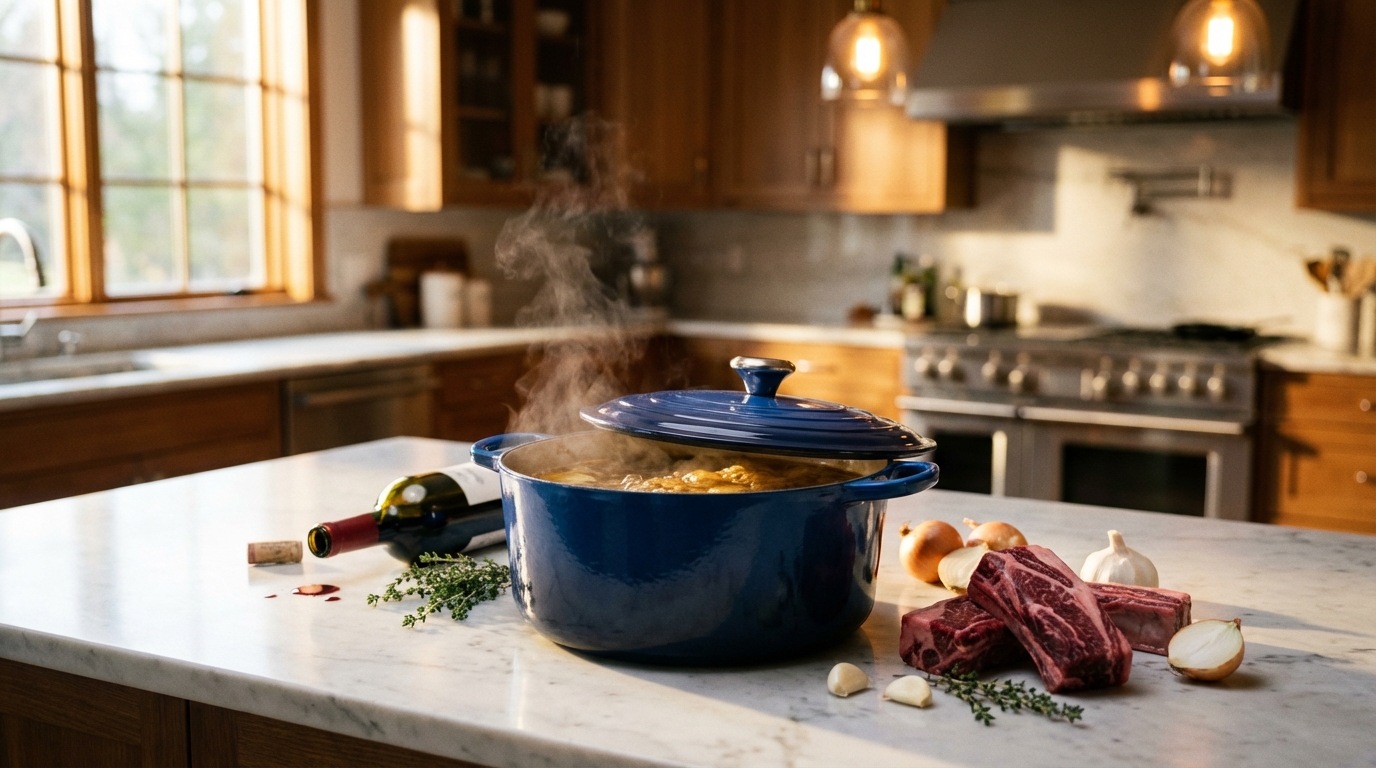
Essential Tools and Ingredients for Everyday Braising
Transform weeknight dinner into restaurant-level comfort by searing in a wide enameled Dutch oven, then slow-cooking with a half-submerged mix of homemade stock, drinkable red wine, and a stealth umami trio--dried mushrooms, miso, and vinegar--to melt tough meat into silken richness.
Choosing durable, affordable cookware for consistent results
Enameled cast iron Dutch ovens remain the gold standard for braising thanks to their exceptional heat retention and distribution. They maintain steady temperatures during long cooking times, transforming tough cuts into tender meat without hot spots [7]. While premium options ($380-435) deliver lifetime durability with lighter construction and superior handles [8], budget-friendly alternatives ($60-90) perform remarkably well in tests [7][8].
When selecting cookware, prioritize a wider cooking surface that allows proper searing without overcrowding--ideally 10 inches or more across [8]. Look for substantial handles you can grip confidently with oven mitts, since these vessels become seriously heavy when full [7]. Wall height matters too.
Traditional Dutch ovens excel at moisture retention, while shorter-walled
Building a flavorful braising liquid with pantry staples
Your braising liquid is what transforms tough meat into something extraordinary. Start with a flavorful base that rises about halfway up your meat--just enough to create steam without drowning it [10]. While water works in a pinch, stock delivers way more flavor. For store-bought versions, grab low-sodium options and boost them with umami-rich additions like soy sauce, garlic, and herbs [10]. Red wine creates incredible depth (think beef bourguignon), but use wine you'd actually drink--overly sweet bottles become cloying as they reduce [10]. Stretch that wine by mixing it with water or stock.
Tomato-based liquids create naturally thick, rich sauces. Go for whole peeled tomatoes and crush them by hand--they taste better than pre-diced varieties, which are often underripe [10]. Want to take your braise from good to unforgettable? Try this flavor trifecta: crushed dried mushrooms (for maximum extraction), a splash of red wine vinegar (to cut through richness), and miso paste (for deep umami) [11]. These simple pantry staples create restaurant-quality depth [11]. Don't skip the deglazing step--those browned bits stuck to the pot are pure gold.
Hit them with wine or vinegar to dissolve all that concentrated flavor [11]. Layer in aromatics like bay leaves, thyme, rosemary, garlic, juniper berries, or peppercorns for complexity you can't get from a single ingredient [12]. Here's a pro tip: instead of straining out the vegetables at the end, blend them right into your sauce. You'll get better texture, keep all those developed flavors, and waste nothing [11].
Step‑by‑Step Guide to How to Braise Meat Perfectly
Dry-brine, sear, and slow-braise at a gentle 190 degreesF until a fork glides through the meat, then purée the veg right into the pot for a zero-waste, spoon-coating sauce brightened with a last-second hit of acid.
Preparing, seasoning, and searing for maximum flavor
Start with dry brining--this simple step makes all the difference. Season your meat generously with salt, place it on a wire rack, and pop it in the fridge for at least 1-2 hours (overnight is even better) [11][13].
This draws moisture out, then back in with the dissolved salt, seasoning the meat from the inside out [11]. If you're working with bone-in cuts like short ribs, tie them with kitchen twine to keep everything together during cooking [11].
When you're ready to cook, heat your
Low‑and‑slow cooking, temperature control, and finishing the sauce
Once you've seared your meat and built your braising liquid with aromatics, move the covered pot to a preheated oven--this is where the magic happens. The oven's even heat eliminates hot spots and creates the perfect braising environment [14]. Aim for 300-325 degreesF (some cooks go up to 350 degreesF) to maintain that gentle simmer you're after [15]. Your liquid should hover around 190 degreesF--hot enough to work its magic on tough cuts without turning them chewy [11]. Here's the thing about braising: forget internal temperatures. You'll know it's done when a fork slides through the meat like butter [11]. Short ribs might take 2-3 hours, while a hefty pork shoulder could need 6-8 hours.
Be patient--you're literally transforming the meat's structure [14]. When your meat is fork-tender, it's sauce time. Remove the meat and set it aside (cover it to keep warm). Now you've got options: strain out the vegetables for a cleaner sauce, or--my favorite trick--purée everything together with an immersion blender. This creates an incredibly rich, waste-nothing sauce that captures every bit of flavor [11]. Reduce the sauce until it coats a spoon nicely. Too thick?
Add a splash of stock. Too thin? Keep simmering [11]. The final touch is crucial: brighten those deep, rich flavors with something acidic--a squeeze of lemon, splash of vinegar, or handful of fresh herbs. Maybe add some pickled onions or capers [15]. This contrast is what separates weeknight dinner from something truly special [14].
Troubleshooting, Variations, and Making Braising a Habit
Master braising by choosing collagen-rich cuts, searing deeply, simmering gently at 180-190 degreesF with liquid only halfway up the meat, and cooking just until fork-tender--not falling apart--to transform tough meats into succulent, make-ahead meals that taste even better the next day.
Common mistakes and quick fixes for tender outcomes
Even experienced cooks make key braising missteps that can turn promising dishes tough or flavorless. The most fundamental error is choosing the wrong cut--lean meats like chicken breast or pork loin will dry out rather than tenderize [16]. As covered earlier, select collagen-rich cuts like chuck, short ribs, pork shoulder, or lamb shanks that transform during slow cooking [16]. Improper browning sabotages flavor development from the start. Take time to sear meat thoroughly until deeply browned, working in batches to prevent overcrowding that causes steaming instead of caramelization [16][17].
Temperature mismanagement undermines tenderness--cooking too hot forces muscle fibers to contract excessively and squeeze out moisture [17]. Maintain a gentle simmer (around 180-190 degreesF) in the oven (300-325 degreesF) or use the lowest stovetop setting that produces lazy bubbles [16][17]. Your cookware choice matters here--a quality Using too much liquid is surprisingly common; proper braising requires only enough to reach halfway up the meat, allowing the top portion to roast while the bottom gently simmers [17][18]. Lid discipline matters--each time you peek, you release heat and extend cooking time [16]. Resist checking more than once per hour [17].
If your braise finishes tough, don't crank the heat--instead, continue cooking gently until meat yields easily to a fork [17]. For watery, bland results, remove the meat and reduce the sauce until it coats a spoon, then finish with acid (vinegar or citrus) and fresh herbs to brighten flavors [17][18]. Remember that braising isn't just about cooking until meat falls apart--this often means it's overcooked and dry [18]. Instead, cook until the meat is tender but still holds its shape, which preserves moisture and texture [18].
Batch cooking, meal‑prep ideas, and storing leftovers safely
Braised dishes shine as make-ahead meals--they often taste even better after flavors meld overnight and freeze beautifully. Store leftovers in airtight containers within two hours of cooking to prevent bacterial growth [19]. The temperature danger zone between 40 degreesF and 140 degreesF accelerates bacteria multiplication, so cool large batches of braised meat by dividing them into shallow containers before refrigerating [19]. Properly stored braised dishes keep 3-4 days refrigerated or 3-4 months frozen while maintaining quality [19].
For meal prep, transform yesterday's braised meat into entirely new dishes--shred beef chuck for tacos, slice brisket for sandwiches, or add short ribs to pasta sauce [20]. When reheating, match your original cooking method: reheat oven-braised dishes covered with foil in the oven, and stovetop braises in a pan [20]. All reheated leftovers should reach 165 degreesF internal temperature for safety [19]. While microwave reheating works in a pinch, add a splash of liquid and cover to retain moisture [20].
Freeze portion-sized containers of braised meat for quick weeknight meals--just thaw in the refrigerator overnight or use the defrost function if time is short [19][20]. Label everything with contents and date to prevent mystery containers from lingering too long [21]. Your braising efforts pay off throughout the week when you have tender, flavorful meat ready to transform into quick weeknight meals.
- Braise at 180-190 degreesF to melt collagen without drying meat.
- Use collagen-rich cuts like chuck, short ribs, or pork shoulder.
- Brown meat deeply before braising to build flavor base.
- Liquid should only reach halfway up the meat, not submerge it.
- Cook until fork-tender, not falling apart, to retain moisture.
- Reduce sauce after braising and finish with acid for brightness.
- Store braised dishes 3-4 days refrigerated or 3-4 months frozen.
- https://annex.exploratorium.edu/cooking/icooks/2-1-03article.html
- https://www.ricardocuisine.com/en/articles/food-chemistry/643-how-to-perfect-the-art-of-braising
- https://blog.thermoworks.com/meat-cooking-101-when-to-cook-low-and-slow/
- https://www.kansasbeef.org/in-the-home/how-to-cook-beef/11-low-cost-beef-cuts-for-cheap-meals
- https://www.wildcountrymeats.com/making-the-most-of-tough-cuts-braising-slow-cooking-and-marinades/
- https://www.allrecipes.com/article/the-best-meat-for-slow-cooking/
- https://www.thespruceeats.com/best-dutch-ovens-4072913
- https://www.americastestkitchen.com/equipment_reviews/2136-braisers
- https://www.reddit.com/r/AskCulinary/comments/1qdii1g/cookware_for_braising/
- https://food52.com/story/21887-change-the-way-you-cook-braising
- https://virginiawillis.com/braising-basics-five-steps-to-perfectly-braised-meats/
- https://www.theflyingbutcher.com/blog/the-amateur-chefs-guide-to-braising
- https://mylescooks.substack.com/p/how-to-braise
- https://www.bonappetit.com/test-kitchen/cooking-tips/article/how-to-braise
- https://food52.com/story/26005-how-to-braise
- https://www.tastingtable.com/1753910/common-mistakes-braising-meat/
- https://chefscircle.co.uk/the-chefs-circle-academy/knife-skills-cutting-techniques/10-braise-problems-tough-meat-thin-sauce-dull-flavour-fixed/
- https://www.quora.com/What-are-common-mistakes-when-braising-meat-and-how-can-they-be-fixed
- http://www.fsis.usda.gov/food-safety/safe-food-handling-and-preparation/food-safety-basics/leftovers-and-food-safety
- https://workweeklunch.com/leftovers-tips/
- https://rumbameats.com/how-to/how-to-store-food-in-the-fridge-leftovers-meal-prep/