How to Know When a Stainless Steel Pan Is Hot Enough for Searing

About Misen
By focusing on quality materials and smart features that add value, we're able to offer
incredible kitchen tools at honest prices.
Summary
Mastering the perfect temperature for searing in stainless steel pans is essential for achieving restaurant-quality results at home. This comprehensive guide explores the science of heat conduction, the Leidenfrost effect, and practical testing methods to ensure your pan reaches the ideal temperature. Learn specific temperature ranges for different foods, troubleshooting tips for common issues, and expert techniques to prevent sticking and achieve the perfect sear every time.
The Science Behind Perfect Stainless Steel Pan Temperature
Quality stainless steel cookware with aluminum or copper cores compensates for stainless steel's poor heat conductivity, creating superior cooking performance.
How Stainless Steel Conducts and Retains Heat
Stainless steel alone has relatively poor heat conductivity at just 15 watts per kelvin per meter - significantly lower than aluminum (235 W/K/m) and even carbon steel (45 W/K/m) [1]. To compensate for this, quality cookware incorporates aluminum or copper cores to improve heat distribution while maintaining the non-reactive cooking surface [2]. Basic stainless steel pans struggle with heat transfer, making temperature-sensitive cooking challenging without these conductive core materials [3]. That's why well-designed cookware, like our stainless steel pans, features aluminum cores that combine stainless steel's durability with better heat conductivity. The metal's composition - typically 18% chromium and 10% nickel in 18/10 grade cookware - creates a surface that stays functional for over a decade with proper care [2].
The Leidenfrost Effect: The Secret to Non-Stick Stainless Cooking
Here's something amazing about stainless steel: when heated properly, it becomes naturally non-stick thanks to the Leidenfrost effect. You'll know your pan is ready when water droplets form perfect little balls that dance across the surface rather than immediately sizzling away. This happens because the water's bottom layer instantly vaporizes on contact, creating a steam cushion that makes the droplet float [4].
This dancing water tells you something important - your pan has reached the sweet spot for cooking, especially for searing. Too cold? Food sticks. But when you see that Leidenfrost effect happening around 200°F, you've got a surface that releases food better than non-stick coatings [5]. Master this simple visual cue, and you'll prevent sticking, achieve even cooking, and keep your food's nutrients intact through proper heat distribution [4].
Why Food Sticks When Your Pan Isn't Hot Enough
Here's what's really happening when food sticks: proteins in your food form chemical bonds with metal atoms in the pan's surface. These bonds range from weak attractions to stronger connections, especially with protein-rich foods like eggs or chicken [6].
When your pan isn't hot enough, three things work against you. First, you don't get that protective steam barrier between food and metal. Second, the oil can't properly fill the pan's microscopic valleys to create a protective coating [6]. Third, you miss out on the moisture in your food creating that insulating vapor layer we talked about [7].
Cold food makes everything worse by shocking the pan's temperature down. That's why letting ingredients come to room temperature before cooking makes such a difference - chilled food disrupts the steam barrier that prevents sticking [7]. Keep that pan temperature consistently high enough throughout cooking, and you'll maintain the vapor barrier that makes stainless steel perform beautifully [8].
Temperature Zones: Understanding the Heat Spectrum for Searing
Think of your stainless steel pan as having different temperature "sweet spots" for different foods. Around 200°F, you'll see the Leidenfrost effect kick in - that's your baseline for non-stick cooking [9].
The basic principle? Match your heat to your ingredients. Since we cover specific temperatures for different foods in detail later (see "Ideal Temperatures for Different Foods and Searing Goals"), here's the key concept: your pan's surface actually changes behavior at different temperatures. When cold food hits hot metal, the surface pores widen and grip the food. As the pan reheats, those pores narrow and naturally release your food - that's why patience pays off when searing [9].
For now, remember that heartier proteins need higher starting temperatures while delicate items do better with gradual heating. The magic happens when you maintain consistent temperature throughout cooking to preserve that natural non-stick effect [9].
Foolproof Methods to Test Your Pan's Temperature
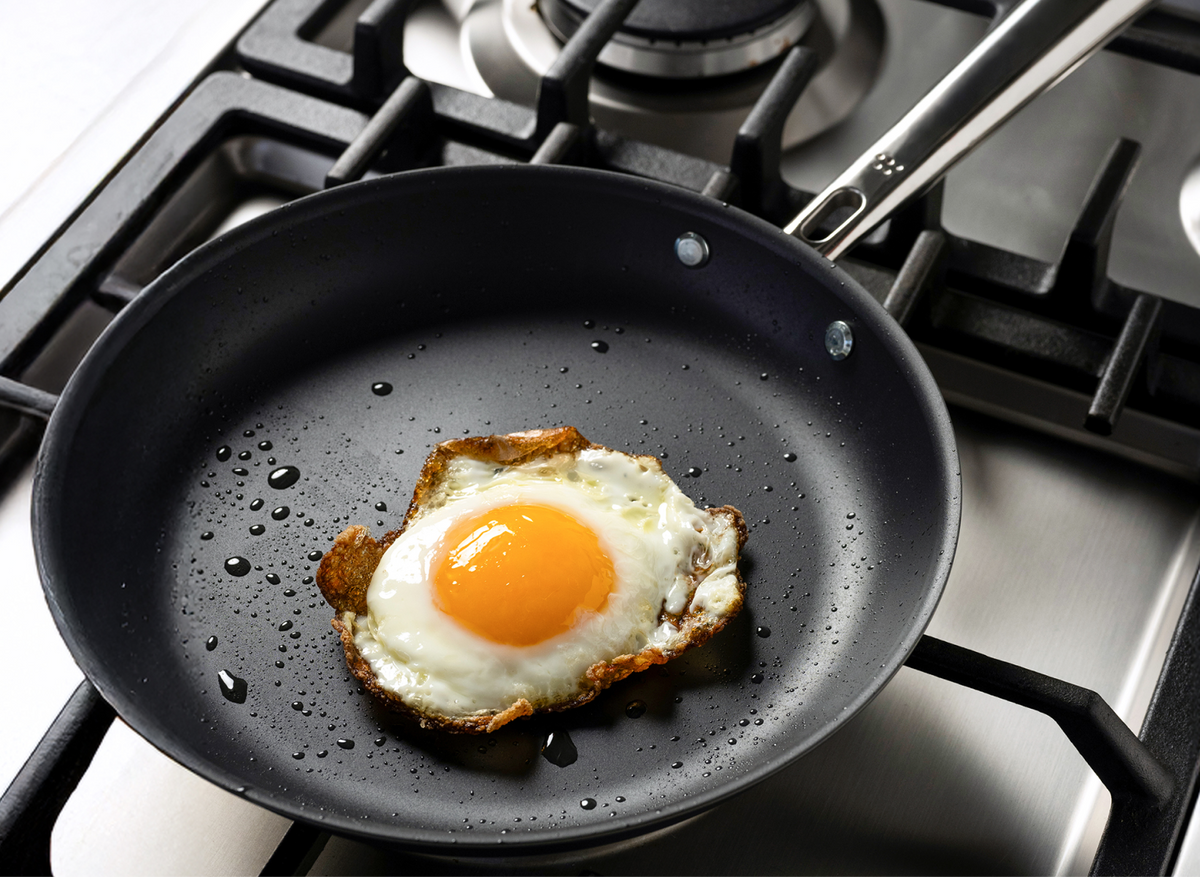
The water droplet test reveals when your pan reaches the ideal temperature - water forms a perfect ball that dances across the surface before evaporating.
The Water Droplet Test: How to Perform and Interpret Results
The water droplet test is your best friend for knowing when your stainless steel pan is ready. Here's how to do it: Heat your pan over medium-high heat, then add a few drops of water. At first, the water will just sizzle and evaporate - that means you need more heat. Keep testing with small amounts of water until you see the magic happen: a single droplet forms a perfect ball that rolls and dances across the surface like mercury before disappearing. This dancing droplet tells you the pan has reached the ideal temperature for creating a naturally non-stick surface - even better than coated pans. Once you see this, reduce the heat slightly to maintain the temperature, add your oil, and wait for it to shimmer before adding food. This simple test takes the guesswork out of preheating and sets you up for perfect searing every time.
Visual and Sensory Cues: Smoke Points, Color Changes, and Hand Tests
Beyond the water droplet test, you can rely on visual cues to know when your pan is ready. Watch how your oil behaves - when it's properly heated, it'll thin out and glide across the pan in one smooth layer, looking almost like heat waves rising from hot pavement. If you see thick, slow-moving oil droplets instead, give it more time. For different heat levels, water droplets behave differently on a dry pan: at medium heat, they'll sizzle on contact; at medium-high to high heat, they'll roll and dance before vanishing. Important safety tip: only test with water on a dry pan - never add water to hot oil. Keep an eye on your oil's smoke point too. If it starts smoking, you've gone too hot - let the pan cool down a bit before adding food. A good rule of thumb is to preheat your pan until it passes the water test, then add oil and wait for that fluid, shimmering movement. If you notice oil burning in empty spots or excessive smoke, turn down the heat right away.
Using Infrared Thermometers for Precision Temperature Reading
Infrared thermometers can be tricky with stainless steel pans. Here's what you need to know: that laser pointer you see? It's just showing you where you're aiming, not actually measuring temperature. The real challenge is that stainless steel's shiny surface reflects heat rather than emitting it, which can give you wildly inaccurate readings. You might point it at a pot of boiling water and get a reading of 100°F instead of the actual 212°F! These thermometers work great on cast iron or dark surfaces, but struggle with stainless steel unless there's oil on the surface. For the most accurate temperature reading on your stainless steel pan, consider using a surface thermometer designed specifically for cookware, or rely on the visual cues and water droplet test we've discussed.
Combining Testing Methods for Different Cooking Scenarios
Different cooking tasks call for different testing approaches. For high-heat searing, start with the water droplet test to confirm your pan is hot enough for that perfect crust, then watch for your oil to flow smoothly across the surface before adding meat. When you're cooking delicate items like fish or eggs, rely more on visual cues - the oil should move fluidly but definitely not smoke. For recipes that require temperature changes during cooking, combine the water test with watching how food behaves in the pan. Here's a pro tip: when food initially sticks but then releases on its own, that's your pan telling you it's at the perfect temperature. The metal's microscopic pores grip the food at first, then release it as the heat equalizes. One crucial reminder for all these methods: always let your ingredients come to room temperature before cooking. Cold food from the fridge will drop your pan's temperature and mess with that beautiful non-stick effect you've worked to achieve.
The Perfect Preheating Process for Stainless Steel
Medium heat preheating for 2-3 minutes prevents warping and creates the ideal non-stick surface when the water droplet test shows a dancing mercury-like ball.
Step-by-Step Guide to Properly Preheat Your Pan
Start with your stainless steel pan on medium heat - high heat can warp your pan and create permanent hot spots [16]. Let it warm for 2-3 minutes, then it's time for the water droplet test (we'll dive deeper into this technique in the next section). Add a few drops of water using a 1/4 teaspoon measure [17]. At first, the water will just evaporate. Keep testing until you see something magical happen: a single water droplet will form a perfect sphere that glides across the surface like a ball of mercury. This means you've hit the sweet spot - around 200°F where the Leidenfrost effect kicks in [17].
Once you see that dancing water droplet, dial the heat back slightly to maintain temperature [18]. Now add your oil - vegetable, canola, or avocado oil work great because they can handle the heat. Swirl to coat the pan evenly [17]. You'll know the oil's ready when it thins out and flows across the pan in one smooth, glistening layer. Still seeing thick, slow-moving oil droplets? Give it another moment to heat up [17].
This simple preheating process transforms your pan into a naturally non-stick surface that rivals any coated cookware [18]. For delicate foods or gentle sautéing, try a different approach: start with medium-low heat and add oil along with your ingredients, then gradually increase the temperature as everything cooks together [18].
How Long to Preheat Based on Pan Size and Stove Type
Your pan size and stove type play a big role in preheating time. A standard 10-inch skillet usually needs about 2-3 minutes on medium heat, but this can vary based on your pan's thickness and whether you're using gas, electric, or induction [19]. Each heat source works differently - gas heats from below, electric coils radiate heat, and induction heats the pan directly.
The construction of your pan matters too. Quality stainless steel cookware with aluminum or copper cores heats much faster and more evenly than basic stainless steel (which, as we discussed earlier, has poor heat conductivity) [19]. That's why investing in well-constructed cookware like high-quality stainless steel pans can make such a difference in your cooking.
No matter what size pan or stove you're using, the water droplet test is your best friend. Just add a teaspoon of water and watch for that telltale sign - a single blob that glides across the surface like it's skating. This happens when you hit the Leidenfrost effect temperature range (between 212-379°F), and it works the same whether you're using a small sauté pan or a large skillet [19].
Finding the Sweet Spot: Not Too Hot, Not Too Cold
The magic happens right around 200°F - this is where your stainless steel pan transforms into a naturally non-stick surface that outperforms coated cookware [11]. Finding this sweet spot takes a bit of practice, but it's worth mastering.
Start by preheating your pan on medium heat for 2-3 minutes. As the pan heats, something interesting happens at the microscopic level - the surface actually ripples faster and faster. When these ripples reach the right speed, they create a bouncing effect that keeps food from sticking [11].
Keep an eye out for warning signs that you've gone too hot. Smoking oil? Food burning in empty spots? Time to dial it back. Remember, you want just enough heat to maintain that non-stick effect without scorching your dinner.
For delicate items like vegetables or garlic, take a gentler approach. Start cooler and add your oil right along with the food, then gradually bring up the heat together [11]. This technique gives you more control and helps prevent those tender ingredients from burning before they're cooked through.
Common Preheating Mistakes That Ruin Your Sear
Let's talk about the mistakes that can turn your perfect sear into a sticky mess. First up: cold ingredients. Taking food straight from the fridge to the pan causes a temperature shock that breaks down the protective steam barrier we've been building. The result? Food that sticks like glue [8]. Always let your proteins come to room temperature first.
Another common error is cranking up the heat too high from the start. This doesn't speed things up - it just warps your pan and creates hot spots that burn food unevenly. Stick with medium heat and be patient [20].
Here's a mistake even experienced cooks make: constantly moving food around. When cold food hits the pan, the surface pores grip it temporarily. But here's the thing - if you leave it alone, those pores will release naturally as the temperature equalizes [8]. Patience pays off with a beautiful crust.
Skipping the water droplet test is another recipe for disaster. If water just evaporates or breaks into tiny droplets instead of forming that perfect rolling sphere, your pan isn't ready yet [8]. This simple test can save you from a stuck-on mess.
Finally, choose your oil wisely. Regular butter, bacon fat, and olive oil have low smoke points that lead to burning and bitter flavors. For high-heat searing, reach for vegetable, avocado, or canola oil instead [20]. These oils can take the heat without breaking down, giving you that perfect sear every time.
Ideal Temperatures for Different Foods and Searing Goals
Different proteins require specific temperature ranges - red meat thrives at 375-450°F while delicate fish performs best at 325-375°F.
Red Meat Perfection: Temperature Guidelines for Steaks and Burgers (375-450°F)
For optimal red meat searing, preheat your stainless steel pan to 375-450°F before adding oil. At this temperature range, the Maillard reaction progresses rapidly, creating those complex flavors and rich brown crust we all love. Start by preheating your pan gradually on medium heat to prevent warping and ensure even heating. Once the pan is properly heated (you'll know it's ready using the water droplet test from earlier), add a high smoke point oil like vegetable or canola oil, which can handle temperatures up to 440-460°F without breaking down. For steaks, maintain the pan temperature between 375-425°F during cooking - this sweet spot allows proper browning while preventing burning. Try this two-stage approach: sear at 425°F for about 2 minutes per side, then reduce to 375°F to finish cooking to your desired doneness. This method ensures a crispy, flavorful crust while giving you precise control over the internal temperature.
Poultry and Pork: Balanced Heat for Proper Browning (350-400°F)
Poultry and pork require precise temperature control for optimal browning without sticking or burning. For chicken with skin, preheat your stainless steel pan to 350-400°F and allow 7-8 minutes of searing time for proper browning, while skinless chicken needs just 3-5 minutes. As discussed in the science section, your pan needs to reach the right temperature to create that natural non-stick surface. To prevent sticking, bring your meat to room temperature before cooking by removing it from the refrigerator 30-60 minutes ahead of time. Pat the meat completely dry and season with salt up to a day in advance for maximum flavor development. After achieving the initial sear, you can transfer the pan directly to a 400°F oven to finish cooking through - chicken breasts typically need 5-10 minutes depending on thickness. Remember to let the meat rest for 5 minutes before serving to allow juices to redistribute evenly throughout.
Delicate Proteins: Seafood and Fish Temperature Control (325-375°F)
Delicate proteins like fish and seafood require precise temperature control between 325-375°F to achieve optimal results in stainless steel pans. The key is maintaining consistent heat that creates a proper sear without overcooking the delicate flesh. Start by preheating your pan on medium heat for 2-3 minutes until it reaches the ideal temperature (use the water droplet test covered earlier). For fish and seafood, use high smoke point oils like avocado oil or algae oil to prevent burning while achieving that golden crust. When you add the cold protein, it will initially stick to the surface, but don't panic - resist the urge to move it. Wait for the natural release that happens when the fish or seafood develops proper caramelization. This patience pays off with restaurant-quality results.
Plant-Based Searing: Vegetables and Meat Alternatives (350-425°F)
Plant-based meat alternatives require precise temperature control between 350-425°F to achieve optimal browning and texture. Unlike traditional proteins, plant-based meats cook significantly faster and don't shrink as much during cooking - 12 ounces of cooked plant-based meat yields roughly the same portion as 1 pound of cooked animal protein. For best results, preheat your stainless steel pan gradually on medium heat until it's properly heated, then add a high smoke-point oil like avocado or grapeseed. Plant-based meats are particularly prone to sticking, so a properly preheated pan is crucial. When searing plant-based burgers or grounds, aim for an internal temperature of 130-135°F for the ideal texture - any lower results in mushiness while higher temperatures create an unpleasantly bouncy consistency. For vegetables and other delicate plant-based ingredients, start with medium-low heat and add oil along with the food, bringing everything up to temperature gradually to prevent sticking.
Maintaining and Managing Temperature Throughout the Cook
Prevent temperature drops by bringing ingredients to room temperature and working quickly when adding oil and food to maintain the natural non-stick effect.
Preventing Temperature Drop When Adding Food to the Pan
Temperature drop when adding food is one of the biggest challenges in achieving a perfect sear. Cold ingredients can dramatically lower pan temperature, disrupting the Leidenfrost effect and causing food to stick rather than develop that golden crust you're after. As we discussed in the temperature guidelines sections, bringing proteins to room temperature is crucial - but let's focus on what happens once you're ready to cook.
Once your pan reaches proper heat, add oil and immediately place food in the pan - there's no need to preheat the oil separately. When searing proteins, resist the urge to move them around. The meat will initially stick to the pan's surface but will naturally release once proper temperature is restored and caramelization occurs. For high-heat searing, work quickly when adding oil and food to prevent the oil from burning - add the fat, turn around, grab your protein and place it in the pan without delay. If you're cooking multiple batches, allow the pan to fully reheat between additions to maintain consistent temperature throughout the cooking process.
Oil Selection: Choosing the Right Fat for Your Target Temperature
Selecting the right oil based on smoke point is crucial for achieving the perfect sear without setting off smoke alarms. For high-heat searing above 500°F, avocado oil and refined safflower oil provide excellent heat tolerance without breaking down. Oils that can handle temperatures around 450°F include extra light olive oil (not extra virgin), clarified butter, ghee, peanut oil, sunflower oil, and corn oil. For moderate heat cooking between 350-400°F, your best bets are refined coconut oil, canola oil, grapeseed oil, and refined sesame oil.
Here's a practical tip: minimize the amount of oil in the pan to reduce smoking - either apply oil directly to the food or use just enough to coat the cooking surface. Butter can be used on stainless steel but has a lower smoke point, making it better suited for medium-heat cooking. For higher temperature applications, consider clarifying butter first to remove milk solids and increase its smoke point. While olive oil works on stainless steel, its lower smoke point makes it better for medium-heat cooking or finishing dishes rather than high-heat searing.
Recovery Techniques When Your Pan Loses Too Much Heat
When a stainless steel pan loses heat after adding food, several techniques can help recover proper cooking temperature. The pan's microscopic surface pores initially widen due to temperature drop, causing food to stick temporarily. Rather than immediately cranking the heat to maximum, maintain medium-high heat and allow the pan to naturally come back to temperature - this lets the narrowing pores properly release the food once heat rebuilds.
For proteins cooked sous vide, resist the urge to use maximum heat for recovery, as extremely high temperatures can cause uneven cooking and burning. Instead, keep heat at medium-high (around 7 out of 9 on electric ranges) to maintain consistent temperature while developing proper caramelization. The key is understanding that some initial sticking is normal and temporary - once the pan recovers temperature, the food will naturally release as the surface pores contract back to their original size.
Adjusting Heat Levels for Multi-Stage Cooking
Multi-stage cooking requires careful temperature management as you transition between different cooking phases. Start by preheating your pan on medium heat for proper temperature control, then adjust based on your cooking goals. For dishes that begin with searing and finish with braising, first heat the pan to create fond - those flavorful browned bits that stick to the surface - then deglaze with liquid to build a sauce.
When moving from stovetop to oven, stainless steel's versatility really shines. Unlike nonstick cookware, stainless steel can seamlessly transition from high-heat searing to oven finishing. This makes it perfect for techniques like searing chicken thighs on the stovetop then braising them in the oven. The key is understanding how different stages require different approaches: high heat for initial browning, reduced heat for gentle cooking, and consistent low heat for long braises or reductions.
Troubleshooting Common Temperature-Related Issues
Room temperature ingredients, proper preheating, and patience when food initially sticks are the keys to solving most stainless steel sticking problems.
Solving Persistent Sticking Problems
If food keeps sticking to your stainless steel pan, the fix is usually simple. Start by letting proteins sit out for 15 minutes before cooking - room temperature food releases better than cold [36]. As covered in our preheating guide (see Section 3), warm your pan for 1-2 minutes over medium heat, never high. High heat breaks down cooking fats and actually makes sticking worse [36].
Use the water droplet test from Section 2 to check readiness - drops should dance across the surface, not fizz or scatter [36]. Once ready, add oil and wait for it to shimmer and move like water before adding food [36]. Here's the key: resist the urge to move food around. Let it sit until it releases naturally - the pan knows when it's ready [36].
For eggs and delicate items, use plenty of fat and avoid cooking them straight from the fridge [37]. When cleanup time comes, don't scrub aggressively. Instead, simmer some soapy water in the pan and gently loosen any stuck bits with a wooden spoon [36].
Addressing Uneven Cooking and Hot Spots
Hot spots making your food cook unevenly? Here's a quick test to find them: add a thin layer of water to your pan and bring it to a boil. Watch where bubbles form - rapid bubbling shows hot spots, while quiet areas reveal cold spots [38].
This happens because stainless steel doesn't conduct heat as well as other metals. That's why quality stainless steel cookware, like high-end 5-ply construction pans, incorporates aluminum or copper cores for better heat distribution [38].
To work around hot spots in any pan, keep your food moving. Professional cooks constantly shake their pans - this not only moves the food but also shifts the pan's position over the heat, evening out the temperature [38]. If uneven cooking is a persistent problem, invest in cookware with thicker bottoms and built-in heat-conducting cores. The difference in cooking performance is dramatic [38].
Preventing Oil Smoking and Food Burning
Smoking oil and burnt food are clear signs your pan is too hot. The solution? Keep it at medium heat for almost everything - save high heat for boiling water only [39].
Watch your oil for the right temperature cues. Properly heated oil moves across the pan in one smooth, shimmering layer. If it's moving in slow drops, it needs more time. If it's smoking, you've gone too far [39].
When things start to burn, act fast: lift the pan off the heat, turn down the burner, and wait a moment before continuing [39]. For sauces and delicate cooking, it's better to slightly under-sear than risk burnt bits that will make everything taste bitter [39].
As your pan heats, the metal expands and creates a smoother cooking surface - this natural process helps prevent sticking when you maintain the right temperature [8]. If you see oil smoking in empty spots around your food, that's your cue to reduce heat and move things around to prevent scorching [39]. Remember the oil selection tips from Section 5 - choosing the right oil for your cooking temperature makes a huge difference.
Achieving a Perfect Sear Without Setting Off Smoke Alarms
Getting a great sear without filling your kitchen with smoke comes down to smart temperature management and the right techniques. First, ensure proper ventilation - turn on your range hood before you start cooking, not after smoke appears.
Choose oils with high smoke points for searing (see Section 5 for detailed oil recommendations). Apply oil to the food itself rather than pouring it into the hot pan - this minimizes smoking from oil in empty areas. Use just enough oil to coat the surface; excess oil creates unnecessary smoke without improving your sear.
Work in batches if needed rather than overcrowding the pan. Overcrowding drops the temperature too much and creates steam, preventing proper searing and increasing smoke as moisture burns off. Pat proteins completely dry before searing - surface moisture creates steam and smoke while preventing browning.
If smoke does start to build, don't panic. Reduce heat slightly and lift the pan off the burner for a few seconds. You want the pan hot enough for the Leidenfrost effect (around 200°F as discussed in Section 1) but not so hot that oil instantly burns. With practice, you'll find that sweet spot where you get beautiful browning without the smoke alarm drama.
Key Takeaways
- Stainless steel's poor heat conductivity is overcome by quality cookware with aluminum or copper cores, creating superior heat distribution for perfect searing
- The Leidenfrost effect at around 200°F creates a naturally non-stick surface - watch for water droplets that dance like mercury across the pan
- Always preheat on medium heat for 2-3 minutes and use the water droplet test to confirm readiness before adding oil
- Different foods require specific temperature ranges: red meat (375-450°F), poultry and pork (350-400°F), delicate proteins (325-375°F)
- Let ingredients reach room temperature before cooking and resist moving food once added - patience allows natural release and prevents sticking
- Choose oils based on smoke points and cooking temperatures - high-heat searing requires avocado or refined safflower oil
- Common mistakes include using high heat from the start, cold ingredients, and constantly moving food - all disrupt the non-stick effect
References
- https://www.stainless-structurals.com/blog/comparing-the-thermal-conductivity-of-stainless-steel-to-other-metals/
- https://misen.com/blogs/news/how-to-cook-with-stainless-steel-1?srsltid=AfmBOoq90nFgoR5OyvzgtbH9uMo0eU-UDjGSTAGaUf5kIfmY42KBA7r0
- https://thermtest.com/the-impacts-of-thermal-conductivity-on-cooking-technique
- https://indianexpress.com/article/lifestyle/food-wine/leidenfrost-effect-cooking-stainless-steel-pans-experts-9607868/
- https://misen.com/blogs/news/how-to-use-stainless-steel-pans-for-beginners?srsltid=AfmBOoqrLtNdNQb9KWkl7iTYhKSyhQvxtDJBhedhLvJau7id92e44cFP
- https://www.scienceofcooking.com/why_food_sticks.htm
- https://www.tastingtable.com/1204692/the-scientific-reason-your-stainless-steel-pans-are-sometimes-non-stick/
- https://thepracticalkitchen.com/why-heat-stainless-steel-pans-faq/
- https://misen.com/blogs/news/how-to-use-stainless-steel-pans-for-beginners?srsltid=AfmBOoof5haKAPbyu4Zm4VkHiKwENu4-8inXuGLStb6cO5_jR_dvYH3P
- https://lifehacker.com/how-to-tell-if-your-stainless-steel-pan-is-hot-enough-w-1835458729
- https://theintrepidgourmet.com/2019/01/21/how-to-cook-with-stainless-steel/
- https://blog.thermoworks.com/infrared-thermometry/
- https://blog.thermoworks.com/pan-surface-temperatures/
- https://gastrotools.com/blogs/guides/heres-how-easy-it-is-to-cook-in-a-stainless-steel-pan
- https://www.heritagesteel.us/pages/cooking-techniques?srsltid=AfmBOoqTWogo-pOpRe1wt_H4rLshShAOTYhanL7cKqcIOJoFJqMAP6G0
- https://tastyble.com/how-to/preheat-a-stainless-steel-pan/
- https://misen.com/blogs/news/how-to-use-stainless-steel-pans-for-beginners?srsltid=AfmBOoqw0dEkF-XsyDsP0bsEssdSbnzerQx2X-GcMx21mm-WDMgGWPfJ
- https://www.t-fal.com/blog/post/stainless-steel-cookware-beginner-guide
- https://theskillfulcook.com/how-to-know-when-stainless-steel-pan-is-ready/
- https://misen.com/blogs/news/how-to-use-stainless-steel-pans-for-beginners?srsltid=AfmBOorqjBWmg1eCxD_zIO-722c5P5xwbeWZbRU7JXeCr-3ev3sYTepR
- https://blog.thermoworks.com/thermal-tips-sear-meat/
- https://hestancue.com/blogs/blog-recipes/the-ultimate-guide-for-pan-seared-steak
- https://therealmeal.org/get-cooking/guide-to-searing-and-finishing-meats
- https://misen.com/blogs/news/how-to-use-stainless-steel-pans-for-beginners?srsltid=AfmBOoqe3L6MoCzuRavY-draPL5CwbBXExp7hoEQ9-OOvU-ZMaKbnAoL
- https://algaecookingclub.com/zine/searing-101?srsltid=AfmBOorVgEcUrrO_f97Tf0mOx9yzl-Qb-qD6JD2hVmhiXuuBJf-d39-T
- https://www.americastestkitchen.com/articles/6729-tips-for-cooking-with-plant-based-meat
- https://www.thechoppingblock.com/blog/how-to-properly-heat-your-pan-so-food-wont-stick
- https://www.thekitchn.com/how-to-sear-meat-47333
- https://www.reluctantgourmet.com/how-hot-should-you-heat-your-pan-when-sauteing/
- https://www.amazingfoodmadeeasy.com/info/modernist-cooking-blog/more/what-high-smoke-point-oils-are-best-for-sous-vide-searing
- https://www.souschef.co.uk/blogs/the-bureau-of-taste/how-to-use-a-stainless-steel-pan
- https://www.heritagesteel.us/pages/cooking-techniques?srsltid=AfmBOoqzFuVjPBA-cbKP6xQo8VjYjpMZBqCKNBtQAhDEnWQ5AunVW5NN
- https://www.reddit.com/r/AskCulinary/comments/znr8j3/searing_in_stainless_steel_pan_heat_management/
- https://www.heritagesteel.us/pages/cooking-techniques?srsltid=AfmBOoqazugbfSMys5pxYsx-NU-Pc-KQM70U9-SNWoH2aB9nr-VfVA-I
- https://misen.com/blogs/news/cooking-with-stainless-steel?srsltid=AfmBOoohz7dJia63zNdRE9uwhX2X5x_DbW4NPQ6h2vSyxhpg9Molvlau
- https://www.foodnetwork.com/fn-dish/recipes/how-to-make-stainless-steel-nonstick
- https://www.souschef.co.uk/blogs/the-bureau-of-taste/how-to-stop-food-sticking-in-a-stainless-steel-pan
- https://misen.com/blogs/news/how-to-use-stainless-steel-pans-for-beginners?srsltid=AfmBOorXXQCprLi9B1V5tz_doeMJOl76nEw2KOEoXBEzDvbr7c3RZZse
- https://www.reddit.com/r/AskCulinary/comments/189x3bo/how_to_prevent_burning_on_a_stainless_steel_pan/